Tuesday, November 19, 2013

Crochet Hat Pattern Tutorial


This is the last altered boot cuff pattern.
I wanted to get this posted incase you are making the entire set to give as holiday gifts.
If you purchase the main color of yarn (Aran in the tutorials) in the large 14oz skeins, then just 1 skein will make all 4 projects. You just need 1  (6oz) skein of the trim color (Passion in the tutorials) to make all 4 projects.

Materials:

I used the same Aran and Passion yarns.
Size J/10 (6.00mm) crochet hook.
Yarn needle.

 Gauge is the same as the boot cuff pattern


DC = Double Crochet
SC = Single Crochet
SS = Slip Stitch
CH = Chain  
The CH 3 at the beginning of each row is considered a DC in this pattern

Feel free to sell your finished items.


Hat pattern:

Using the Aran yarn - CH 30

Row 1 - DC in 3rd CH from hook and in each CH across (29 DC). CH 3, turn.

Rows 2 - 26 - DC in next DC, working in the Back Loop Only, DC in the next 25 DC, working through both loops, DC in last 2 DC (29 DC). CH 3, turn.

Row 27 (this is the right side) - DC in next DC, working in the Back Loop Only, DC in the next 25 DC, working through both loops, DC in last 2 DC (29 DC). 

Fasten off. Leave a 16" long tail.


Hat trim:

Row 1 - With right side facing, attach Passion yarn with a SC (directions in the neck warmer pattern) to the first DC of the long side. SC in the same DC as joining. Work 2 SC in each DC across (54 SC). CH 1, turn.


Rows 2 & 3 - SC in each SC across, CH 1, turn. (54 SC)

Row 4 - Work a reverse SC (aka Crab Stitch) in each SC across (54 reverse SC).
Fasten off leaving a 6" tail.


Rose:

With the size J hook and Passion yarn, CH 29 and follow the rose pattern in the boot cuff tutorial.


Finishing:

Thread the Aran tail onto the yarn needle. With wrong sides facing, sew the hat edges together through the back loops to maintain the ridged pattern. Knot the yarn securely at the top but do not fasten off. Now working around the top, weave the yarn needle in and out of the DC's all the way around.


 Pull the yarn very tight to close the top of the hat. Fasten off, weave in ends.

Thread the Passion tail onto the yarn needle and sew the trim edges together. Fasten off, weave in ends.

Turn hat right side out, fold brim up, tie on the rose.


There you have it! One very simple, very quick basic pattern altered slightly to make boot cuffs, neck warmers, wrist warmers and a hat.
My intention for this pattern series is to encourage novice crochet artists to look at patterns in a different way. To see the full potential of a pattern.

Thank you for visiting my blog :)

Crochet Wrist Warmers Pattern Tutorial


In my last post, I used my basic boot cuff pattern to make a neck warmer.
Now I am going to use that same basic pattern to make wrist warmers.

Please feel free to sell your finished warmers.


Materials:

Once again, I used the same Aran and Passion yarns.
Size J/10 (6.00mm) crochet hook
Size F/5 (3.75mm) crochet hook
Yarn needle

Gauge is the same as the boot cuff pattern

DC = Double Crochet
SC = Single Crochet
SS = Slip Stitch
CH = Chain  
The CH 3 at the beginning of each row is considered a DC in this pattern


Wrist warmer - Make 2

With Aran yarn and J hook - CH 15

Row 1 - DC in 3rd CH from hook and in each CH across (14 DC). CH 3, turn.

Rows 2 - 11 - DC in next DC, working in the Back Loop Only, DC in the next 10 DC, working through both loops, DC in last 2 DC (14 DC). CH 3, turn.

Row 12  (this is the wrong side) - DC in next DC, working in the Back Loop Only, DC in the next 10 DC, working through both loops, DC in last 2 DC (14 DC). 

Fasten off.


Wrist warmer top trim: 

Switch to the F crochet hook.
With wrong side facing and working along the long edge, attach Passion yarn to the first DC, one row down.


Row 1 - CH 4 and DC in the same DC. *CH 1, DC in next DC, CH 1, DC in the same DC*.
Repeat from * to * across to end. CH 1, turn. (12 V stitches)


Row 2 - SC in first DC, *5 DC in the next CH 1 space ( this will be the center of the V stitch), SC in the next CH 1 space (this will be the CH 1 space between the V stitches)* 
Repeat from * to * across, ending with 5 DC in last CH 1 space. (12 - 5 DC shells)

Fasten off, leaving an 8" tail.


Wrist warmer bottom trim:

Row 1 - Using the F crochet hook, working along the opposite long edge with right side facing, attach the Passion yarn with a SC (directions in the neck warmer pattern), SC in the same DC.
Work 2 SC in each DC across (24 SC). CH 1, turn.


Rows 2 & 3 - SC in each SC across (24 SC).
At the end of Row 3, fasten off, leaving a 6" tail.


Rose: Make 2

Using the size F crochet hook and Passion yarn, follow the rose pattern for the boot cuffs.


Finishing:

Thread the long Aran tail onto the yarn needle. Fold the warmer with right sides facing, sew the edges of the warmer together working in the back loops to maintain the ridged pattern.
Fasten off, weave in ends.

Thread the long Passion yarn tail onto the yarn needle and sew the top trim edges together. Fasten off, weave in the ends. Repeat for the bottom trim. Turn the warmer right side out.


If you want the warmers longer and/or wider, this pattern is easily altered by simply adding stitches or rows.

Thank you for visiting my blog :)


Friday, November 15, 2013

Crochet Neck Warmer Pattern Tutorial


We are going to use the boot cuff pattern from my last post to make this neck warmer.
Honestly, the boot cuff pattern only needs to be altered slightly to make it into a neck warmer.

I have designed this neck warmer to be a tad longer than average, which makes it more versatile.

Materials:

I used the same Aran and Passion yarn I used to make the boot cuffs.
Buttons - I used 2 from this shop - Tessas Lil Treasures
Size J/10 (6.00mm) crochet hook
Yarn needle (optional) I use it to weave in the ends

Gauge is the same as the boot cuff pattern


DC = Double Crochet
SC = Single Crochet
SS = Slip Stitch
CH = Chain  
The CH 3 at the beginning of each row is considered a DC in this pattern

With Aran yarn - CH 18

Row 1 - DC in 3rd CH from hook and in each CH across (18 DC). CH 3, turn.

Rows 2 - 32 - DC in next DC, working in the Back Loop Only, DC in the next 14 DC, working through both loops, DC in last 2 DC (18 DC). CH 3, turn.

Row 33 (this is the right side) - DC in next DC, working in the Back Loop Only, DC in the next 14 DC, working through both loops, DC in last 2 DC (18 DC). 

Fasten off.

Neck warmer trim:


Working along the long edge of the neck warmer, with right side facing, attach the Passion yarn with a SC.

*If you aren't familiar with attaching the yarn with a SC - follow the directions below*

Make a loop on your hook exactly the same as you do to start a beginning chain.
Leave the loop on your hook and insert your hook into the stitch you're attaching to.


Yarn over and pull the yarn through the stitch. Now you have 2 loops on your hook.


Yarn over and pull the yarn through both loops on the hook. Now you have a SC :)


Row 1 - *Work 2 SC in each DC along the long side of the neck warmer.


Continuing around the neck warmer, Work 3 SC in the corner of the short edge, 1 SC in each DC across the short edge and 3 SC in the last corner of the short edge.* Repeat from * to * once more. Join with a SS to the first SC - do not turn. (174 SC)


Row 2 - CH 1, SC in same stitch as CH 1. * Skip the next SC, 5 DC in the next SC, skip the next SC, SC in next SC*. Repeat from * to * until you have completed the last SC before the corner. Skip 2 SC (this will allow us to work the DC shell in the center SC of the 3 SC corner) Work 6 DC in the center SC of the corner. Skip 2 SC, SC in the next SC, skip the next SC, 5 DC in the next SC, skip the next SC, SC in the next SC. Continue around the neck warmer, skipping 2 SC at the corners so that the 6 DC shell can be worked in the center SC of the corners. Join with a SS to the first SC.
Fasten off, weave in ends.


Cut 2 - 8" pieces of Aran yarn.
Thread the yarn through the buttons.


Place the buttons on the front of the neck warmer, push the yarn ends through to the back and tie a knot to secure the buttons. Weave in ends.


You can make a rose for the neck warmer following the boot cuff rose pattern. In the picture below, I simply used one of the roses I already completed for the boot cuff.


The following pictures demonstrate the versatility of a longer neck warmer. However, if you would prefer a shorter warmer, just finish off at row 28 rather than working 33 rows.


In this photo, I crossed the ends and only fastened 1 button.


For this example, I buttoned the warmer, scrunched up the center where the buttons are and tied the rose around the scrunched section.


Here I folded the warmer in half lengthwise and buttoned 1 button.


I'm sure you will think of many more ways to style this neck warmer!

Thank you for visiting my blog!

As always, sell what you make using this pattern or any pattern on this blog.

Sunday, November 10, 2013

Crochet Boot Cuff Pattern Tutorial


I have received several requests for this boot cuff pattern.
Unfortunately, I have a bad habit of crocheting items without writing down the pattern as I work. If I like the item, I just make a bunch of them while the pattern is still fresh in my memory. This makes it difficult when I decide to make more of the item months later. I have to make sure I still have a completed item or at least a photo that I can copy. Of course, it also makes it difficult to share my patterns with others.

In an effort to break my non pattern habit, I offer to you the very first pattern I have ever written.
This boot cuff pattern is extremely easy and works up quickly.

You do not need my permission to sell your completed boot cuffs. However, I know a lot of you feel more comfortable selling your items when you have permission from the designer. So...here goes...Please feel free to sell your completed items made from my pattern. Sell them on any online (yes, including Etsy) or off line venue of your choice. No, you do not have to give me credit for the pattern.

Please do not sell the actual pattern. I am offering the pattern for free to all that stumble across this blog and would prefer it remain free for everyone.

Please let me know if you find an issue with the pattern or if you need help.

*********************************************************************************

Materials:

 Red Heart yarn - Aran / I used the Super Saver because it's what I had but a 7oz skein is all you need
Caron Simply Soft yarn - Passion (purple) You only need a small amount
Size J/10 (6.00mm) crochet hook
Size D/3 (3.25mm) crochet hook
Yarn needle

Gauge - 6 DC x 3 Rows = 2"x2"
 Boot cuff measures (including trim) approx. 7" long x 12" wide

DC = Double Crochet
SC = Single Crochet
SS = Slip Stitch
CH = Chain  
The CH 3 at the beginning of each row is considered a DC in this pattern

Pattern: (Make 2)
Using the Aran yarn and size J crochet hook:

CH 21

Row 1 - DC in 3rd CH from hook and in each CH across (20 DC). CH 3, turn.

Rows 2 - 18 - DC in next DC, working in the Back Loop Only, DC in the next 16 DC, working through both loops, DC in last 2 DC (20 DC). CH 3, turn.

Row 19 - DC in next DC, working in the Back Loop Only, DC in the next 16 DC, working through both loops, DC in last 2 DC (20 DC). CH 1.

Bottom trim - Rotate your hook to the the left so that you can now crochet along the long edge.
You will crochet through the ends of the DC rows rather than along the top of the DC's.


Using the size D crochet hook:
Row 1 - 2 SC in each DC across (38 SC). CH 1, turn.

Row 2 - 1 SC in each SC across (38 SC). CH 1, turn.

Row 3 - (This is the right side) SC in each SC across (38 SC). Fasten off, leaving a 24" tail. You will use the tail to sew the cuff ends together.

Top trim:
Using the size D crochet hook and the Passion yarn:

Working on the long edge opposite from the bottom trim and with the right side facing up, attach the Passion yarn to the first DC, one row down from the top. We are leaving the top row of DC's unworked.


(We will be working a V stitch (DC, CH 1, DC) in each DC across)


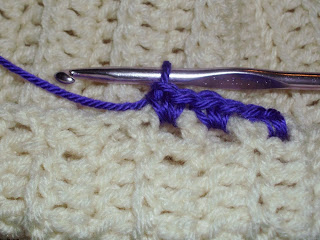
Row 1 - CH 4, DC in the same DC, *CH 1, DC, CH 1, DC in next DC*. Repeat from * to * across to the last DC. CH 1, DC, CH 1, DC in last DC. (19 V stitches). CH 1, turn.

This is what we have so far:


Row 2 - SC in first DC, *5 DC in the next CH 1 space (this is the center of the V stitch), skip the next DC, SC in the next CH 1 space (this is the CH 1 space between the V stitches)*. Repeat from * to * across to the last V stitch, 5 DC in the last CH 1 space (19 - 5 DC shells). Fasten off, leaving an 8" tail. You will use the tail to sew the top trim together.


Cuff finishing.
Thread the yarn needle onto the long Aran yarn tail. Fold the cuff in half, with wrong side facing out and line up the stitches. Sew the 3 rows of SC's (bottom trim) together. Sew the DC rows together in the back loop only to maintain the ridged pattern.


Sew up to the last 3 rows, turn the cuff right side out and finish sewing the last 3 rows.


Finish off, weave in ends.

Thread the needle onto the Passion yarn tail and sew the top trim together. Finish off, weave in ends.
Fold top 3 rows down.


Rose (Make 2)

Part 1

Using the size D hook and the Passion yarn:

CH 30

Row 1 - SC in 2nd CH from hook and in each SC across (29 SC). CH 3, turn.

Row 2 - 4 DC in first SC, *SC in next SC, 5 DC in next SC* repeat from * to * across, ending with 5 DC in last SC (15 - 5 DC shells). Fasten off leaving a 10" tail. You will use the tail to sew the rose together. Set aside.


Part 2 of rose:

With the same yarn and hook, CH 30. Fasten off. Set aside.

Part 3 of rose:

With the same yarn and hook, CH 2.

Row 1 - 6 SC in 2nd CH from hook, SS in first SC to join (6 SC). CH 1, turn.

Row  2 - 2 SC in each SC around, SS in first SC to join (12 SC). CH 1, turn.

Row 3 - SC in first SC, *2 SC in next SC, SC in next SC*, repeat from * to * around, ending with 2 SC in last SC, SS in first SC to join (18 SC). Fasten off, leaving a 10" tail. You will use the tail to sew this piece to the bottom of the rose.

Assemble the rose:

Thread the needle onto the tail of part 1. Roll the shell strip around itself to resemble a rose:


Turn the rose upside down and sew across the bottom to secure. Fasten off, weave in ends.

Work your size D crochet hook through a small section of stitches on the bottom center of the rose. Pull part 2 of the rose (the CH 30) through that section with your crochet hook. Even the chain ends:


Thread the needle onto the tail of part 3 of the rose. Center part 3 onto the bottom of the rose and sew it all the way around, making sure to sew through the 2 CH sections to secure. Fasten off, weave in ends.


Using the CH sections, tie the rose to the boot cuff.
And...your done :)


Worn on combat boots:


The boot cuffs made in different colors and embellished differently:


The cuffs above have a slightly different top trim and are embellished with a crochet heart. I attached a heart charm to the crocheted hearts.


This pair also have a slightly different top trim and I embellished them with buttons.


I embellished the roses on this pair using chains and charms. This is the pair that sold first in my Etsy shop.

I will be adding 3 more projects made using this pattern with slight variations and a very different outcome.